If you are running Windows 7 on your PC, and you have an unused USB flash drive, then you can use ReadyBoost to speed up your system. Using a fairly new concept, ReadyBoost, allows you to use flash memory—like a USB flash drive or a memory card—to virtually add system memory and improve performance without having to physically open your computer to add standard memory modules.
Check out this short video from Mike Agerbo of GetConnectedTV to get a better understanding of how ReadyBoost works in Windows 7.
Here are step-by-step instructions on how to turn ReadyBoost on or off for a storage device:
- Plug your flash drive, flash memory card, or other ReadyBoost-capable device into your computer.
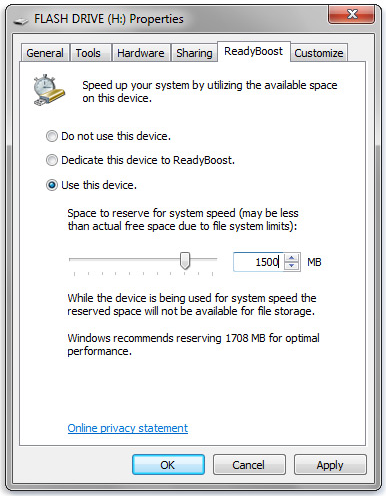
- When the Autoplay dialog box appears, select Speed up my system, under General options.
- From the Properties dialog box, click the ReadyBoost tab, and choose one of the 3 available options:— Do not use this device – Turn ReadyBoost off.— Dedicate this device to ReadyBoost – Use the maximum available space on the flash drive or memory card for ReadyBoost (Windows will use all available space on the device to boost system speed, while leaving any files already stored on the device).— Use this device – Use a specified amount of the available storage on the device to speed up your PC (Use the slider to choose the amount of available space on the device you want to use).
- Click OK.

Windows 7 ReadyBoost can help speed up your computer.
Congratulations! You have sucessfully set up ReadyBoost. You should now start noticing improvements in the speed and performance of your computer.